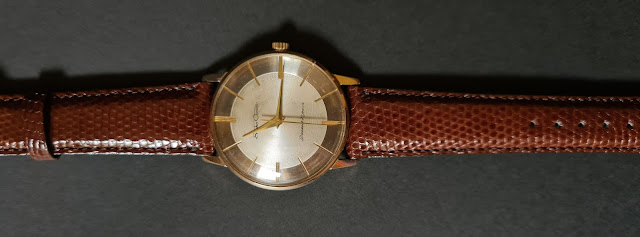
Renovating a vintage watch dial or case is difficult, and the general advice to watch collectors is tread warily. In fact, in the case of dials, the advice is usually “don’t”. But this article may just offer an option in some circumstances.
The watch being renovated here is a Seiko Crown. Or is it? It was purchased on a Japanese auction, which generally brings few surprises although when every second item is described as “junk”, you know it is buyer beware.
Good Seiko Crowns sell for hundreds of dollars, and this one was only A$100 but when it arrived I found that a Seiko Crown dial was mated with a Seiko Skyliner movement (a 402), and the case back was from a Seiko Cronos. There was some damage to the clear coat on the dial and some corrosion to the case but both are common in 60 year old gold plated watches. The movement was operating well and keeping good time.
For starters the watch was dismantled. The case back, bezel with crystal, and dial with movement, were separated from the case. The hour and minute hands were carefully removed to give access to the dial.
The dial had damage to the top clear coat in two main areas. There was some pitting on the outer dial between 4 and 5, and a circle of damage around the centre wheel which appeared to be caused by the hour hand rubbing against the dial face. That was possibly due to combining a dial and movement from different models.
Gold plated watches from this era are notorious for corrosion. Technology at the time didn’t allow plating to stainless steel so manufacturers used base metal, sometimes brass. If the gold wore off, corrosion would be allowed to develop, fueled by moisture, including human sweat. There were three
main areas of corrosion on this case. One adjacent to the stem tube, one on the opposite side of the case, and some corrosion on the edge of the case back.
DIAL RENOVATION:
Let’s start with a brief simple description of a standard vintage watch dial. Essentially they contain a metal base, a colour coat, printed text, and a clear topcoat to protect the whole thing.
In a previous article I wrote the following about dial renovations - “DO NOT ATTEMPT TO REPAIR A DAMAGED VINTAGE DIAL. It is not for amateurs.” The different components of a watch dial’s surface can react in different ways. The top coat might fail and apart from looking tatty, it ceases to protect the print and colour coats. Or corrosion may start in the metal dial base and work its way up through the top layers.
There are many online stories about failed dial repairs but when you are a committed “fiddler”, and love a challenge, it is difficult to turn your back on opportunity. I decided to try and improve the appearance of this dial.
I had learned that dial renovations must be tackled with great caution. You definitely don’t use abrasives. Gentle rubbing with a cotton bud using water, or at most lighter fuel, is the preferred method of cleaning but I was looking for something that would soften the contrast between the normal appearance of the clear coat and the damaged sections, particularly the circular scoring. Essentially that is what the top coat does. It gives an even coating that allows the dial colour and its descriptive text to shine through.
I have read descriptions of collectors applying new top coats with thin spray lacquer or even hairspray (shock, horror) but introducing solvents and other harsh chemicals just seemed a no-no.
But what about wax? And not just any wax, but one designed and formulated to protect antiques. Renaissance Wax was developed by the British Museum to use on old and valuable items in their collection. It contains no acids, solvents, or other harmful chemicals and yet imparts a protective film.
I applied three thin coats of wax to the dial, using a cotton bud. I allowed 10 minutes or so for each application to dry and then polished it off with a soft cotton cloth. The improvement to the appearance of the circular scoring around the centre wheel was almost immediate. The marks on the outer part of the dial between 4 and 5 were still there but less noticeable. I was concerned that the wax might add some extra gloss to the dial but that did not happen. Job done and a good result.
CASE RENOVATION:
The first step was to remove obvious corrosion which appeared as a green powdery material. Brushing with a nylon brush removed some of the worst corrosion but I opted for a chemical solution to neutralise the reaction and white vinegar seemed to be safest way.
The case and case back were immersed in white vinegar overnight and then brushed with a stiff nylon brush. They were both polished with metal polish and then cleaned in a vibration bath. Once again the Renaissance Wax was rubbed into the affected areas, and the excess removed. I will need to keep an eye on this case, and re-apply wax as needed.
So, there you have it. A 60 year old watch gets a new lease on life using comparatively safe techniques and a humble natural wax product provides some protection and improves the overall appearance of the dial.
By Greg Smith


Comments
Post a Comment